How to Transfer Your WordPress.com Blog to Self Hosted WordPress.org
Back on the grinnnnnd after NYFW, and ready with a new blogging tips posts on my most frequently asked e-mail question after I started my blogging series! Keep your e-mails and comments coming… they provide great ideas for topics that weren’t originally on my content calendar.
This week is all about switching from WordPress.com to self hosted WordPress.org- and I’m going to try to make this as easy as possible… I know you can do it! 🙂
For those of you who use Blogger, that will be covered next week. Sorry for the wait, but there’s too much to go over within this tutorial to combine the two.
What You Will Learn
- How to transfer your WordPress.com blog to Self Hosted WordPress(.org)
Resources You Need
- BlueHost (domain and hosting provider)
- WordPress.org
- Coming Soon Page plugin (optional)
Step 1: Setup
Before we dive into the initial transfer, let’s make sure we’re set for SUCCESS! (ok that was cheesy…) Also, make sure you review on the difference between WordPress.com and WordPress.org HERE if you need clarification.
1. Do I have a domain and hosting account setup?
If not, Bluehost offers very affordable pricing on domain/hosting plans. Read my tutorial on getting started with Bluehost if you need additional help.

If you already purchased a domain name with WordPress.com, don’t worry, we’ll cover that as well.
2. Do I have WordPress installed on my hosting account?
If not, setup instructions on installing WordPress to your hosting account here.
3. Do I have my website theme installed?
No theme? No worries. I go over various options in finding your website theme here.
4. Do I like the look and feel of my Self Hosted WordPress blog?
Before we transfer the WordPress.com content, we want to make sure that your self hosted site is aesthetically setup.
Don’t sweat about the little fixes, as this can be changed over time, but at this point we’re just focusing on the overall functionality and design.
Make sure while you are in this process, you have a “Coming Soon” page so visitors that happen to find their way onto your new site know your blog is in the works. This also allows you to test and tweak the new site without it being live. Here is the plugin I recommend.
If you purchased your domain name/hosting from BlueHost, you’re site will not be live until you activate it.
Please keep in mind:
Your site will not go down during this process if done correctly. You are essentially “copying” the content from your old blog and “pasting” it onto your new blog. I know it’s scary, but you won’t delete your site.
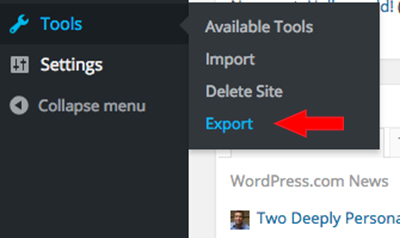
Step 2: Export WordPress.com Data
– Sign in to your WordPress.com account (Not Self Hosted).
– In your Dashboard go to Tools >> Export.
– Two options will appear: 1. Guided Transfer for $129 or 2. Export Free.
Obviously we are going for #2…unless you don’t want to bother with the rest of this tutorial, go with option #1.
– You will then be asked which content you would like to export, select “All Content”.
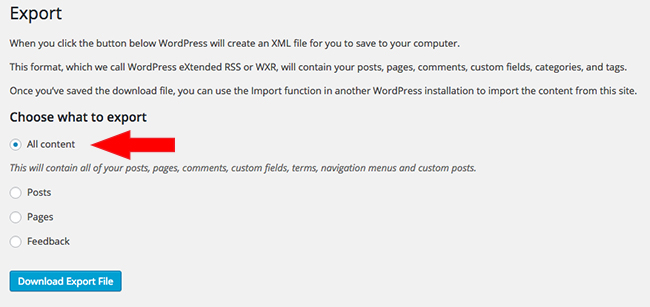
– An XML file will then be downloaded to your computer. This contains all of your posts, pages, images, comments, etc. Keep this handy!
Step 3: Import to Self Hosted WordPress (.org)
– Sign in to your Self Hosted WordPress.org dashboard.
– Go to Tools >> Import >> WordPress
We want to import our WordPress.com content to our Self Hosted WordPress.
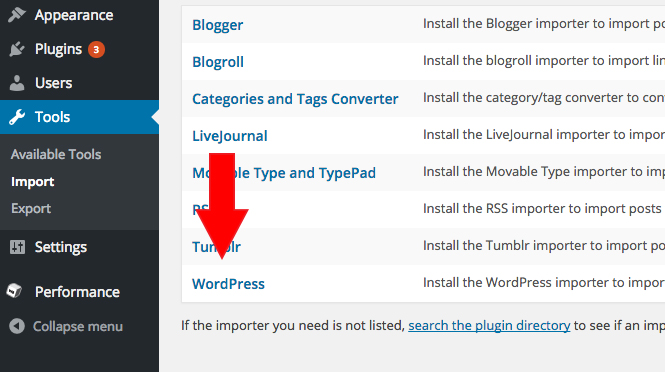
– You will then be asked to download the WordPress Importer, go ahead and install, then activate.
– It will then ask you to upload your XML file (the one we exported from WordPress.com aka your old site)
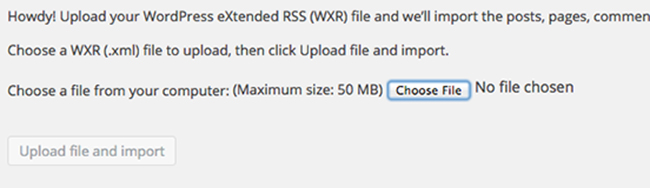
– The next screen will ask if you wish to assign the old posts to a new author. You can leave the author or make a new one…personally I would leave it. Make sure to check the box that says “Download and import file attachments”. This is how you import all your photos.
Step 4: Redirecting Visitors
Before I begin, I want to clarify this step is for those that have a domain name like: ABCBlog.wordpress.com.
For those that purchased a domain through WordPress.com, I will explain how to switch it over below in 4b.
WordPress.com offers a service to redirect your old URL to the new URL. Which means redirecting any traffic from your old blog to your new blog. That way your audience is automatically redirected to your new site as well as your search engine rankings. The service is only $13/year and well worth it. I would do it for two years in order to provide your audience enough time to get used to your new URL.
The official term for this is a 301 redirect.
Step 4b: Already have a domain
For those of you who purchased a domain through WordPress.com, we would need to switch it over to your new hosting plan.
If you decided to go with BlueHost, during the signup phase they will ask if you have a domain already or want to register a new one. Select the option “I have a domain name”, and insert the domain that you registered at WordPress.com.
Next thing you would have to do is change the nameservers to point to the hosting provider (BlueHost). WordPress.com offers some great support with regards on how to change domains.
Done!
And there you have it! Please feel free to ask any questions as I am here to help 🙂
Happy blogging!
xx Brittany
